Written and researched by Mark Bregman and Rindert Kramer
Sending signed phishing emails
Every organisation, whatever its size, will encounter phishing emails sooner or later. While the number of phishing attacks is increasing every day, the way in which phishing is used within a cyber-attack has not changed: an attacker comes up with a scenario which looks credible enough to persuade the target to perform a certain action like opening an attachment or clicking on a link in the email. To avoid such attacks the IT or security team will tell users to check for certain things to avoid falling for these phishing emails. One of the recommendations is to check if the email is digitally signed with a valid certificate. However, in this blog, we present an attack that abuses this recommendation to regain the recipient’s trust in the sender.
Traditional phishing
Countless organizations have fallen victim to traditional phishing attacks where the attacker tries to obtain credentials or to infect a computer within the target network. Phishing is a safe way to obtain such footholds for an attacker. The attacker can just send the emails, sit back and wait for the targets to start clicking.
At Fox-IT we receive lots of requests to run simulated phishing attacks; so our team sends out hundreds of thousands of carefully crafted emails every year to clients to simulate phishing campaigns. Whether it’s a blanket campaign against the entire staff or a spear phishing one against targeted individuals, the big issue with phishing stays the same; we need to persuade one person to follow our instructions. We are looking for the weakest link. Sometimes that is easy, sometimes not so much. But an attacker has all the time in the world. If there is no success today, then maybe tomorrow, or the day after…
To create security awareness among employees, IT or the security team will tell their users to take a close look at a wide variety of things upon receiving emails. Some say you have to check for spelling mistakes, others say you have to be careful when you receive an email that tries to force you to do something (“Change your password immediately, or you will lose your files”), or when something is promised (“Please fill in this survey and enter the raffle to win a new iPhone”).
SPF records
Some will tell their users to check the domain that sent the email. But others might argue that anyone can send an email from an arbitrary domain; what’s known as ‘email spoofing’.
Wikipedia defines this as:
Email spoofing is the creation of email messages with a forged sender address. Because the core email protocols do not have any mechanism for authentication, it is common for spam and phishing emails to use such spoofing to mislead the recipient about the origin of the message.
— Wikipedia https://en.wikipedia.org/wiki/Email_spoofing
This means that an email originating from the domain “ fox-it.com ”, may not have been sent by an employee of Fox-IT. This can be mitigated by implementing Sender Policy Framework (SPF) records. In an SPF record you specify which email servers are allowed to send emails on behalf of your domain. If an email originating from the domain “ fox-it.com ” was not sent by the email server specified in the SPF record, the email message can be flagged as SPAM. By using SPF records you know that the email was sent by an authorized email server, SPF records however, do not disclose the authenticity of the sender. If a company has configured their SMTP server as an open relay server, users can send mail on another user’s behalf which will pass the SPF record check on the receivers end. There are other measures that can be used to identify legitimate mail servers to reduce phishing attacks, such as DKIM and DMARC, however, these are beyond the scope of this blogpost.
What is a digital signature?
To tackle the problem of email spoofing some organizations sign their emails with a digital signature. This can be added to an email to give the recipient the ability to validate the sender as well as the integrity of the email message.
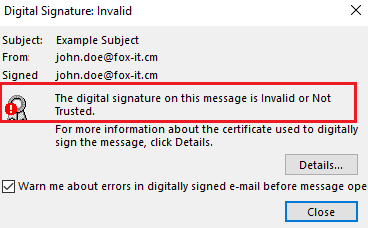
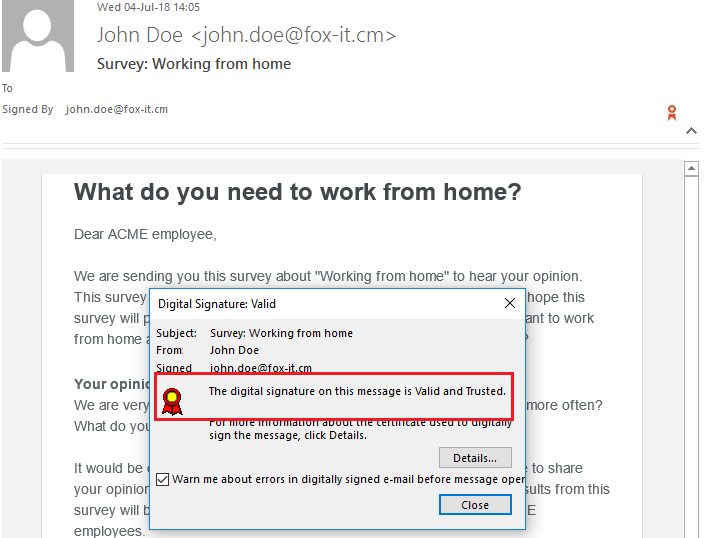
For now we’ll focus on the aspect of validating the sender rather than the message integrity aspect. When the email client receives a signed email, it will check the attached certificate to see who the subject of the certificate is (i.e.: “john.doe@fox-it.com “). The client will check if this matches the originating email-address. To verify the authenticity of the digital signature, the email client will also check if the certificate is issued (signed) by a reputable Certificate Authority (CA). If the certificate is signed by a trusted Certificate Authority, the receiving email client will tell the recipient that the email is signed using a valid certificate. Most email clients will in this case show a green checkmark or a red rosette, like the one in the image below.
By default there is a set of trusted Certificate Authorities in the Windows certificate store. With digital certificates, everything is based on trusting those third parties, the Certificate Authorities. So we trust that the Certificate Authorities in our Windows certificate store give out certificates only after verifying that the certificate subject (i.e.: “john@fox-it.com “) is who they say they are. If we receive a signed email with a certificate which is verified by one of the Certificate Authorities we trust, our systems will tell us that the origin of the email is trusted and validated.
Obviously the opposite is also true. If you receive a signed email and the attached certificate is not signed by a Certificate Authority which is in the Windows certificate store, then the signature will be considered invalid. It is possible to attach a self-signed certificate to an email; in which case the email will be signed, but the receiving email client won’t be able to validate the authenticity of the received certificate and therefore will show a warning message to the recipient.
Common misconception regarding email signing
Some IT teams are pushing email signing as the Holy Grail to avoid being caught by a phishing email, because it verifies the sender. And if the sender is verified, we have nothing to worry about.
Unfortunately, the green checkmark or the red rosette which accompanies a validated email signature seems to stimulate the same behavior as we’ve seen with the green padlock accompanying HTTPS websites. Users see the green padlock in their browser and think that the website is absolutely safe. Similarly, they see the green checkmark or the red rosette and make the assumption that everything is safe: it’s a signed email with a valid certificate, the sender is verified, which means everything must be OK and that the email can’t be a phishing attack.
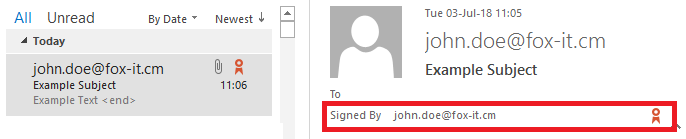
This may be true, if alice@fox-it.com sends you a signed email with a valid certificate: the sender really is Alice from Fox-IT, provided that the private key of the certificate is not compromised. But, if alice@fox-it.cm (notice the ‘.cm’ instead of ‘.com’) sends you a signed email with a valid certificate, that person can still be anyone. As long as that person has control over the domain ‘fox-it.cm’, they will be able to send signed emails from that domain. Because many users are told that the green checkmark or the red rosette protects against phishing, they may be caught off guard if they receive an email containing a valid certificate.
Sending signed phishing emails
At Fox-IT we’re always trying to innovate, meaning in this case that we’re looking for ways to make the phishing emails in our simulations more appealing to our client’s employees. Adding a valid certificate makes them look genuine and creates a sense of trust. So when running phishing simulations we use virtual private servers to do the job. For each simulation we setup a fresh server with the required configuration in order to deliver the best possible phishing email. To send out the emails, we’ve developed a Python script into which we can feed a template, some variables and a target list. Recently we’ve updated the script to include the ability to sign our phishing emails. This results in very convincing phishing emails. For example, in Microsoft Office Outlook one of our phishing emails would look like this:
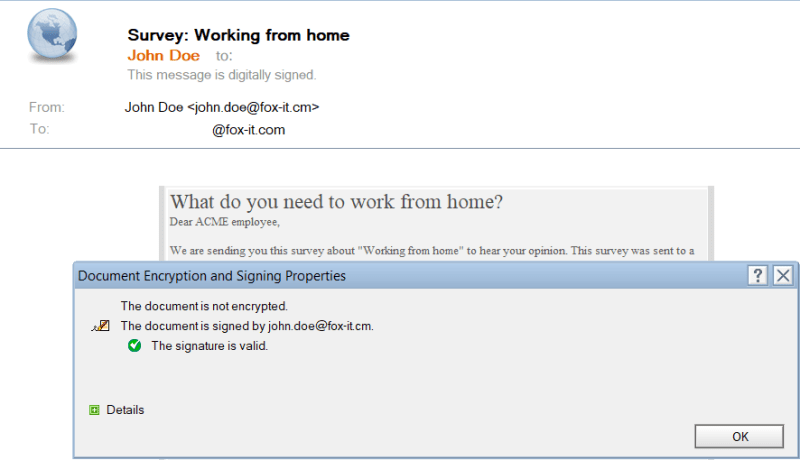
This is not limited to Office Outlook only, it is working in other mail clients as well, such as Lotus Notes. Although Lotus Notes doesn’t have a red rosette to show the user that an email is digitally signed, there are some indicators which are present when reading a signed email. As you can see below, the digital signature does still add to the legitimate look of the phishing emails:
Going the extra mile
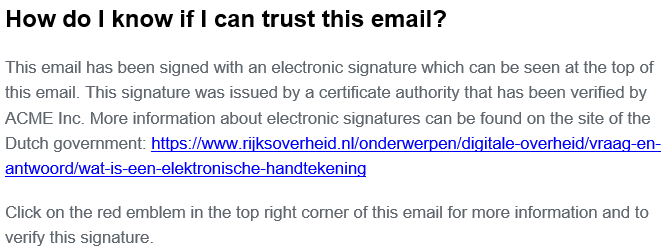
The user has now received a phishing mail that was signed with a legitimate certificate. To make it look even more genuine, we can mention the certificate in the phishing mail. Since the Dutch government has a webpage1 with information about the use of electronic signatures in email, we can write a paragraph that looks something like the the one in the image below.
Sign the email
The following (Python) code snippet shows the main signing functionality:
# Import the necessary classes from M2Crypto library
from M2Crypto import bio, rand, smime

# Make a MemoryBuffer of the message.
buf = makebuf(msg_str)

# Seed the PRNG.
Rand.load_file('randpool.dat', -1)

# Instantiate an SMIME object; set it up; sign the buffer.
s = SMIME.SMIME()
s.load_key('key.pem', 'cert.pem')
p7 = s.sign(buf, SMIME.PKCS7_DETACHED)

# Recreate buf.
buf = makebuf(msg_str)

# Output p7 in mail-friendly format.
out = BIO.MemoryBuffer()
out.write('From: %s\n' % sender)
out.write('To: %s\n' % target)
out.write('Subject: %s\n' % subject)

s.write(out, p7, buf)
msg = out.read()

# Save the PRNG's state.
Rand.save_file('randpool.dat')
This code originates from the Python M2Crypto documentation2
For the above code to work, the following files must be in the same directory as the Python script:
* The public certificate saved as cert.pem
* The private key saved as key.pem
There are many Certificate Authorities that allow you to obtain a certificate online. Some even allow you to request a certificate for your email address for free. A quick google query for “free email certificate” should give you enough results to start requesting your own certificate. If you have access to an inbox you’re good to go.
To get an idea of how the above code snippet can be included in a standalone script, we’d like to refer to Fox-IT’s Github page where we’ve uploaded an example script which takes the most basic email parameters (‘from’, ‘to’, ‘subject’ and ‘body’). Don’t forget to place the required certificate and corresponding key file in the same directory with the Python script if you start playing around with the example script. Link to project on GitHub: https://github.com/fox-it/signed-phishing-email
Mitigation
There are some mitigations that can make this type of attack harder to perform for an attacker. We’d like to give you some tips to help protect your organisation.
Prevent domain squatting
The first mitigation is to register domains that look like your own domain. An attacker that sends a phishing mail from a domain name that is similar to your own domain name can trick users into executing malware or giving away their credentials more easily. This type of attack is called domain squatting, which can result in examples like fox-it.cm instead of fox-it.com . There are generators that can help you with that, such as: https://github.com/elceef/dnstwist
Restrict Enhanced Key Usages
Another mitigation has a more technical approach. For that we need to look into how certificates are used. Let’s say we have an internal Public Key Infrastructure (PKI) with the following components:
* Root CA
* Subordinate CA
The root CA is an important server in an organisation for maintaining integrity and secrecy. All non-public certificates will stem from this server. Most organizations choose to completely isolate their root CA for that reason and use another server, the subordinate CA, to sign certificate requests; The subordinate CA will sign certificates on behalf of the root CA.
In Windows, the certificate of the root CA is stored in the Trusted Root Certification Authorities store, while the certificate of the subordinate CA is stored in the Intermediate Certification Authorities store.
Certificates can be used in many scenarios, for example:
* If you want to encrypt files, you can use Encrypted File System (EFS) in Windows. EFS uses a certificate to protect your data from prying eyes.
* If you have a web server, you can use a certificate to establish a secure connection with a client so that all data is transferred securely.
* Stating the obvious: if you want to send email in a secure way, you can also use a certificate to achieve that
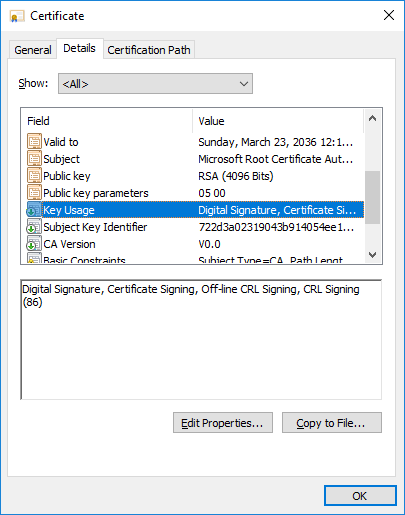
Not every certificate can sign code, encrypt files or send email securely. Certificates have a property, the Enhanced Key Usage (EKU), that states the intended purpose of a certificate. The intended purpose can be one of the actions mentioned above, or a wildcard. A certificate with only an EKU for code signing cannot be used to send email in a secure manner.
By disabling the “Secure Email” EKU from all certification authorities, except from our own root and subordinate CA, phishing mail that is signed with a valid certificate signed by a third party CA, will still trigger a warning stating that the certificate is invalid.
To do that, we must first discover all certificates that support the secure email EKU. This can be done with the following PowerShell one-liner:
# Select all certificates where the EnhancedKeyUsage is empty (Intended Purpose -eq All)
# or where EnhancedKeyUsage contains Secure Email
Get-ChildItem -Path 'Cert:\' -Recurse | Where-Object {$_.GetType().Name -eq 'X509Certificate2' -and ({$_.EnhancedKeyUsageList.Count -eq 0} -or $_.EnhancedKeyUsageList.FriendlyName -contains 'Secure Email')} | Select-Object PSParentPath, Subject
We now know which certificates support the secure email EKU. In order to disable to secure email EKU we have to do some manual labour. It is recommended to apply the following in a base image, group policy or certificate template.
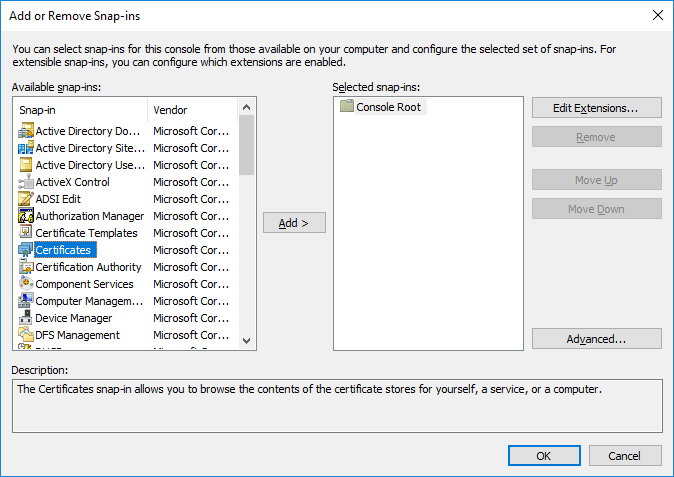
- Run mmc with administrative privileges
- Go to File, Add or Remove Snap-ins, select Certificates
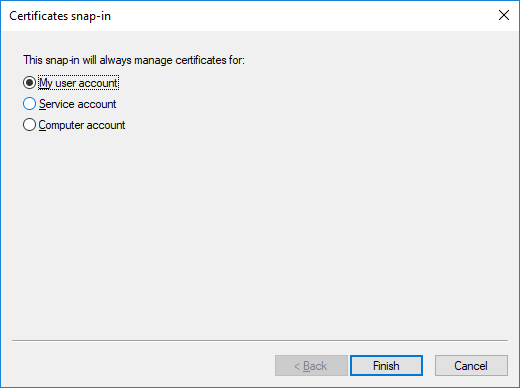
- Select My user account, followed by OK. Please note that this mitigation requires that certificates in all certificates stores must be edited.
- Check if intended purpose states Secure email or All
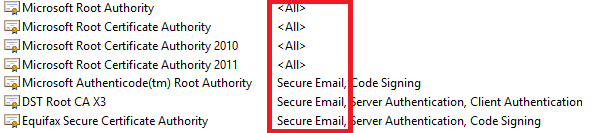
- Check if intended purpose states Secure email or All
- Open the properties of a certificate and click the details tab
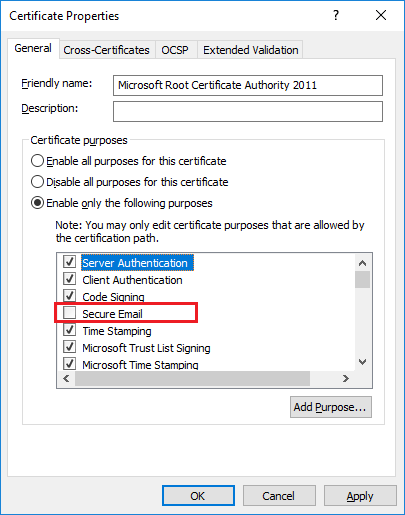
If the intended purpose at step 3.1 stated All,
1. Click Key Usage, followed by Edit Properties.
2. Click Enable only the following purposes and uncheck the Secure Email checkbox
If the intended purpose at step 3a stated Secure Email,
1. Click Enhanded key usage (property)
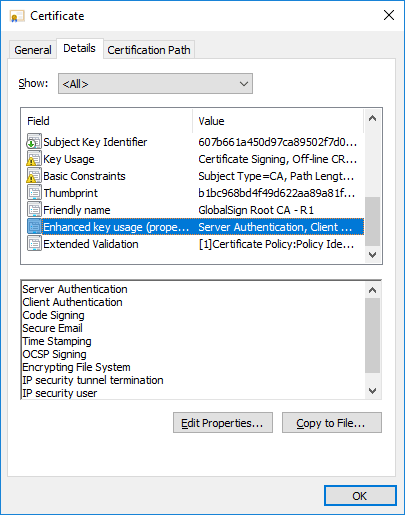
2. Click Edit Properties…
3. Uncheck the Secure Email checkbox
Please keep the following in mind when implementing these mitigations:
* When a legitimate mail has been signed with with a certificate issues by a CA that of which the Secure Email EKU has been removed, the certificate of the email will not be trusted by Windows
* Changing the EKU may have an impact on the working of your systems
* These settings can be reverted with every update in Windows
* New or renewed certificates can have the Secure email EKU as well
This means that in order to only allow your own PKI server to have the Secure Email EKU enabled you must periodically check for certificates that have this EKU configured.
Human factor
With techniques like the one described in this blog post it becomes more and more obvious that users will never be able to withstand social engineering attacks. In a best case scenario, users will detect and report an attack, in a worst case scenario your users will become victim. It is important to perform awareness exercises and educate users, but we should accept that a percentage of the user base could always become a victim. This means that we (organizations) need to start thinking about new and more user friendly strategies in combating these type of attacks.
To summerize this blogpost:
* An email coming from a domain does not prove the integrity of the sender
* An email that is signed with a trusted and legitimate certificate does not mean that the email can be trusted
* If the domain of the sender address is correct and the email has been signed with a valid certificate signed by a trusted CA, only then the email can be trusted.
References
1: https://www.rijksoverheid.nl/onderwerpen/digitale-overheid/vraag-en-antwoord/wat-is-een-elektronische-handtekening (Dutch)
2: https://m2crypto.readthedocs.io/en/latest/howto.smime.html#m2crypto-smime “M2Crypto S/MIME”
